
As a mechanical engineering student, I was around 3D printing all the time. However, my main use for it is a bit different than most engineers. I love using 3D printing for fashion applications. Specifically science fashion.
In addition to the 3D printed jewelry design I do for my company Sci Chic, I love experimenting with 3D printing in other areas of fashion.
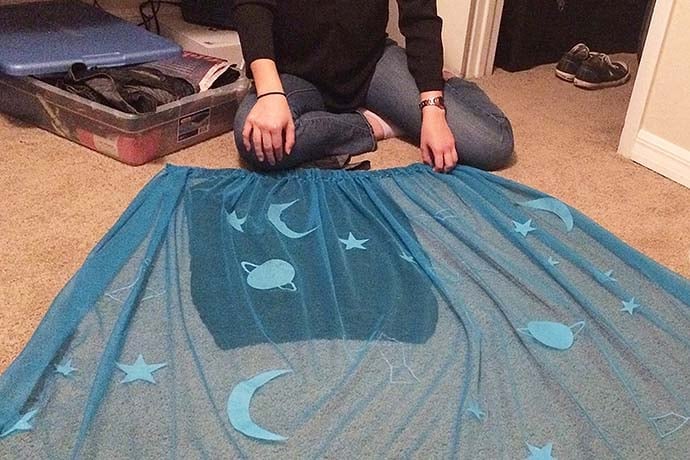
My newest skirt I designed and sewed features a two layer skirt with space designs 3D printed directly onto the fabric. Yes, I realize I am slowly becoming the embodiment of Ms. Frizzle’s closet.
I was inspired to use 3D printing to create my own fabric pattern after seeing the Make Fashion Show at 2016 Bay Area Maker Faire. They created a decoration on the top of a crop top with a 3D printed design and illuminated it using LEDs. This inspired me to think about how to apply this concept to an entire piece of fabric and create exactly the pattern I wanted.
Each design on my skirt was created in SolidWorks computer modeling software and 3D printed individually on the fabric. I made each design simple since detailed designs often have more difficulty attaching to the fabric. The designs were also very thin so that the printer would only need to lay down 2-3 layers of plastic on the fabric. The less time on the printer, the less there is a chance of the fabric moving or ripping or the print failing.
Printing on fabric definitely takes some experimenting. If the tip of the 3D printer gets too close to the fabric it can rip or melt the fabric. Since I had to do a large number of prints on the fabric to generate a pattern, if the last one failed it would ruin all of the previous work I had done. Therefore, I tested the designs before putting them on the final fabric.
I attached the fabric to the bed of my printer using both rubber bands and office clips, and then leveled my print bed with the fabric on it to make the printer think it was printing directly on the print bed surface. Finally, I printed each design one-by-one on the fabric using sky blue PLA plastic.
Once all of the prints were done, I was able to treat it like any normal piece of fabric while sewing. All of the fabric I used I purchased from JoAnn Fabrics. The 3D prints attached best to fabrics that had small holes in it like tulle to give the plastic places to melt into, so I picked a bit heavier fabric that would drape on the outside and flow when I walked. The waistband fabric was actually leftover from when my parents reupholstered their chairs, but it created the exact look I was trying to create. I love reusing fabric whenever I can!
The skirt is super fun to wear and is a great conversation starter about both space and 3D printing! If you have a 3D printer and like sewing, I would recommend giving this project a try.
Get out there and make something new!
What 3D printer did you use? What physical size, in terms of laying out fabric within the bed, large or small?
Erin: I used a FlashForge Creator Pro. The print bed for this machine is 225 x 145 x 150 mm. This is a pretty standard desktop printer size.
What 3D printer did you use? What physical size, in terms of laying out fabric within the bed, large or small?
Erin: I used a FlashForge Creator Pro. The print bed for this machine is 225 x 145 x 150 mm. This is a pretty standard desktop printer size.
Where did you find your designs to print?
Erin: I created the designs myself in solidworks. However, you can use programs like 3D Builder which comes on most Windows computers, and TinkerCAD to create your own designs.
How long did it take to print your dress? How many tries to get everything right?
Erin: The entire printing process took about 2 days with lots of tests on spare fabric. Each pattern took about 5-10 min to print because it was only printing about 2 layers of plastic.
Reprinted with permission from Erin’s website and blog at
http://www.erinwinick.com/steampower/how-i-created-a-space-skirt-by-3d-printing-on-fabric