
In sewing, thread is an essential tool. It adds decorative elements, as well as acts the elements that can secure all of your pieces together.
However, did you know it can have another use all together? Running electricity through you clothing and fabric projects! There is a special kind of thread called conductive thread that can turn your fabric into an e-textile. This thread can be made of silver or stainless steel, and comes on a small bobbin just like normal thread.
By sewing conductive thread into your projects, you can do anything from making gloves compatible with touchscreens to sending power to LED lights on a skirt! Electric circuits need to be connected systems, moving power between a battery, and the items that need to be powered. Conductive thread can serve as that bridge in sewing projects, allowing your circuits to become flexible and sewable.
Want to get your own conductive thread? I would recommend ordering some from Adafruit. You can get 76 feet (23 meters) for $5.95, a great starting point for some fun new technology based sewing projects.
Test out this thread with a small project that will turn your gloves into smartphone compatible gloves!
Smartphone Gloves Project
In order for phone touchscreens to work, they need to have contact with your finger. This is because they use something called a capactive touchscreen which works when your finger touches it and completes its circuit. Therefore, if we add conductive thread to the outside of our gloves, the thread will contact both our skin and the phone, making the gloves now touchscreen compatible.
Materials
- Conductive thread
- Needle
- Knitted gloves
- Clear nail polish
Procedure
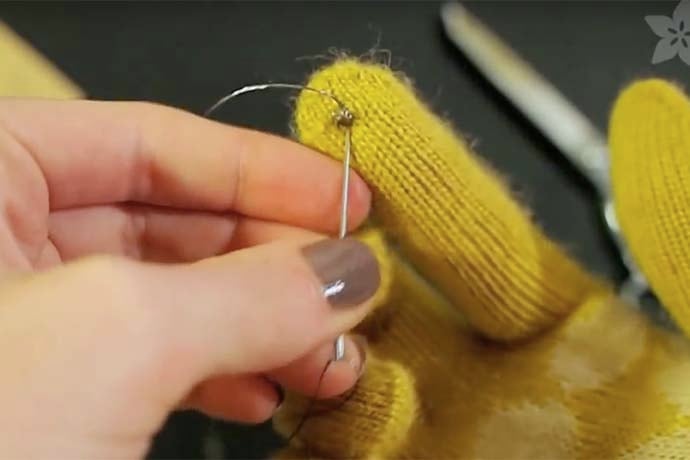
- Thread your needle with a 8in length of conductive thread.
- Starting from the inside of the thumb section of your glove, bring the needle up through a section of the pad of the glove’s thumb finger. Leave about 1.5in extending straight into the glove thumb.
- Once the needle is on the outside of the glove, bring in back inside about 1/8 in down. We are creating a small surface area where your finger can contact the phone and activate it.
- Bring the needle back out of the thumb again and continue this process until you have secured the thread in place.
- You can use a small amount of clear nail polish to seal the ends of your conductive thread, and to secure them in place on the inside of the glove. Do not cover all of the thread as this will limit the conductive nature of the thread.
- Repeat this process on all of the fingers of the glove.
- Test out your new gloves on a smart phone!
Learn More
Adafruit
Want to learn more about adding LEDs to your projects using conductive thread? Check out this fun project by Adafruit!
https://www.youtube.com/watch?v=XpwL71IiPXM
Kitronik E-Textiles and Wearables Tutorials and Resources
https://www.kitronik.co.uk/blog/e-textiles-wearables-tutorials-resources/
LilyPad Bascs: E-Sewing
https://learn.sparkfun.com/tutorials/lilypad-basics-e-sewing
Sew Electric
http://sewelectric.org/diy-projects/
atxdiy Tutorial: Sewing a Simple Circuit (Light Bracelet)
http://www.atxdiy.com/2010/07/05/tutorial-sew-a-simple-circuit/