
What will you need for this project?
- A micro:bit
- Micro USB lead to connect micro:bit to computer
- A computer connected to the Internet
Intro
Joshua Lowe lives in the United Kingdom and he has a passion for helping children to make the move from Scratch to Python. But why is this such a big move? Well we teach our children to code using a block language, generally Scratch, and then expect them to easily move on to text based languages such as Python. The problem that children often face is that while the logic is essentially the same, how we write the code looks very different and potentially very scary.
So how can we bridge the gap between block languages and Python? Well that is where Edublocks comes into play. Edublocks is a block based language that enables children to write real Python code using blocks. The Python code is Python 3 compliant, so we are using the latest version of the language, but we can easily build and take apart the code enabling us to quickly debug issues. Joshua Lowe designed this application two years ago and it has already courted interest from the Python community and from the creator of Python himself, Guido van Rossum. Right now there are 9000 users of Edublocks in 72 countries around the globe. Edublocks works with the Raspberry Pi (http://edublocks.org/) and there is a special web version for the BBC micro:bit which we shall be using in this project.
Oh and lastly, Joshua is 14 years old and started to learn Python three years ago at his local hackspace and Raspberry Jam events.
By creating this project we will learn
- How to code with Edublocks
- How to import libraries of code
- How to use blocks to write Python 3 code
- How a loop works
- How a conditional statement works
- How to use random choice in a game
Getting Started
For this project we shall be using the micro:bit version of Edublocks, which is conveniently located online. With that in mind open a web browser and go to https://microbit.edublocks.org/ and take a look around.
Edublocks has three main areas. Across the top of the screen we can change the look (theme) of Edublocks and we can create new files, open old files and save our work. We can also download the code as a Python .py file or as a .hex file (which is code written specifically for the micro:bit to understand.)
Moving to the left of the screen and we can see the different groups of blocks that we can use to write our projects. These are broken up based on their functionality for example buttons, pins and basic coding blocks. We can click on a group and then drag the blocks in to the final area, the large coding area.
Project 1
For our first project lets keep it simple and scroll a message across the LED matrix of the micro:bit when we press a button.
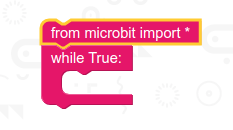
So we start by importing the microbit library, this is found in the Basic section. Drag it into the coding area. This will enable us to write code for the micro:bit. Again from the Basic section we now drag the while True: loop that will contain the code for this project and join it to the previous block.
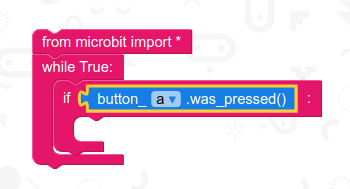
In order to detect a button press, we need to use a conditional test to detect if the button has been pressed. This can be found in the Basic section. Place the If block inside the while True: block. So the test is to see if Button A was pressed and the block for this is located in the Buttons section. Drag this block and place it in the identically shaped slot found in the If block.

In this last step we need to go to the Display section and find the display.scroll block and place that inside the If block. Here we can also change the text inside that block by double clicking on “Hello World” and changing it to something fun! The last block we need is found in Basic and it is called Sleep. Drag sleep and place it inside the If block and underneath display.scroll. The sleep block is used to pause the code for set duration. In this case we shall enter 1000 milliseconds, 1 second.
Now that we have the code completed, click on Download Hex to download the micro:bit compatible code to your computer. Then connect your micro:bit to the computer using the USB lead. Your micro:bit will pop up as if it were a flash drive. Now copy the downloaded Hex file to the micro:bit flash drive, which will start flashing the code (writing the code to the micro:bit) and we can see an orange LED on the back of the micro:bit flash. Once it stops flashing the micro:bit will eject and then we are ready to test the code. When ready press Button A and you will see the message scroll across the display! Well done! Lets try another project.
Project 2
For this project lets create a magic 8-ball that will answer any “Yes or No” question we may pose to it, and how shall we control it? Well with a shake!
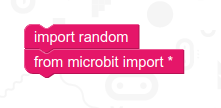
So we start with a new project and the first two blocks that we shall use are from the Basic section and they are import random and from microbit import *. These blocks will import libraries of code that will make our project possible.
Our next block is from Basic and this block is 0 = 0 which we shall use to create an object into which we will store the possible responses that our 8 ball can offer. This object is called a list and we shall use it to store multiple items, in this case the words “Yes”, “No” and “Possibly”. Lists are powerful objects that store information using an index, and we can find items in a list based on their position. For example “Yes” is the first item in our list called choices and that is at position 0, “No” is at position 1 and “Possibly” is at position 2. So using the 0 = 0 block we shall change the first 0 to say choices and then change the second 0 so that it contains the responses, which are wrapped in square brackets, the Python way to identify a list.

Now let’s go back to the Basic section and drag the while True: and the If block into the project. The while True: block connects to the previous block, and we then place the If block inside the while True: this means that the code will constantly check to see if something happens. But what do we want to use to trigger the code? Well in the Accelerometer section we can see a block called accelerometer.was_gesture drag that block into the empty slot for our If block. In the blank space, type the word “shake” along with the quotation marks.

The last block will be placed inside the If block and we can find it in the Display section. We need the display.scroll() block, but not the block with quotation marks! There are two so make sure you choose the right one. Inside this block we need type in a little Python code. This code will use the random library that we imported at the start. In particular it will use the choice function to choose a response from our choices list that we created earlier. This means when we shake the micro:bit, it will choose a random response from the list.

Now that we have the code completed, click on Download Hex to download the micro:bit compatible code to your computer. Then connect your micro:bit to the computer using the USB lead. Your micro:bit will pop up as if it were a flash drive. Now copy the downloaded Hex file to the micro:bit flash drive, which will start flashing the code (writing the code to the micro:bit) and we can see an orange LED on the back of the micro:bit flash. Once it stops flashing the micro:bit will eject and then we are ready to test the code. When ready ask a Yes or No question out loud, and then shake the micro:bit to reveal the answer!
Congratulations you have learnt how to take your first steps with Python.
How can we take this further?
Taking our first steps to learn Python, Edublocks has provided us with a novel introduction to the language, while retaining the relative safety of a block language. If you would like to know more about Edublocks, head over to their website http://edublocks.org/ and try out a few of their example projects.
Learn More
Edublocks
http://edublocks.org/
https://microbit.edublocks.org/
About Joshua Lowe and the creation of Edublocks
https://www.tech4goodawards.com/finalist/edublocks/
Introduction to Python
http://introtopython.org/
https://kidscodecs.com/python-for-kids/