
How to teach WordPress to students is fairly easy to master. Because WordPress publishing software is easy to use, easy to click around and figure out, it is an excellent way to introduce students to publishing online, as well as basic site administration tasks needed to publish. Once these basic writing tasks are mastered, the same resources used to learn WordPress can be used to learn more technical tasks, for example, how to modify templates to display page content.
Teaching WordPress, or any software technology, helps students through a process of self-discovery and mastery. While there likely are genius coders out there who have every PHP and WordPress function memorized in detail, most coders learn two ways. They learn where to go when they need answers to solve a problem and they tinker. They click buttons or try different bits of code, learning from trial and error.
Fortunately, as we’ll see, people who simply want to author content in WordPress have a very short learning curve to master. How to teach WordPress to students is not too difficult.
Goals for Teaching WordPress to Students
There are at least three levels to WordPress mastery, in order of complexity:
- Authoring
- Site Administration
- Technical (Coding, Hosting, Server Administration)
We’ll begin with authoring, even if your goal is to learn the other two levels. Authoring is easy enough that it builds confidence quickly. Also, this article will not cover the technical level for reasons of length. Links to learn more about all three levels are at the bottom of this page. And WordPress is easy enough to tinker with to learn how to accomplish tasks, including many of the more complicated technical tasks.
Materials
You’ll want to have some or all of these materials:
- Student content or dummy text
- Access to a WordPress site
- One or more user accounts
Depending on how organized you need to be, it is ideal to have content available at hand for authors to copy and paste as they learn, then practice, how to add, edit, and delete content. Students might have written material at hand. Or, they might copy text from a web page. There’s also lorem lipsum text, dummy text used by the printing business, available online at lipsum.com and elsewhere, if the goal is to have fake content without having to be distracted by the meaning of the content (unless students know their Latin).
You’ll also need access to a WordPress site. For authoring and site administration, that’s as easy as signing up for a free account with WordPress.com or EduBlogs.org. Some hosting services also make it easy to install a standalone WordPress site but the process has more steps than the free accounts at EduBlogs.org and WordPress.com. It’s also true sites like EduBlogs and WordPress have better privacy controls immediately available, with less effort required. To learn the technical side of WordPress, you’ll need to set up a web hosting account then install the standalone version of WordPress.
Finally, you may want to permission your students as authors. If you don’t know how, skip down to the Add and Permission User Accounts section below before teaching your students how to create content.
Key WordPress Interfaces
For authors and site administrators, there are two key pages they deal with constantly, the administration site home page and the Add Post/Edit Post page. The Add and Edit pages are the same except the latter has content for the page you are editing. The Add Page/Edit Page pages are similar to the post pages with some minor changes. As noted above, WordPress is easy to click around without risk of doing serious damage.
We’ll begin with the Login page and then discuss the other two pages.
Login Page
The default login page for WordPress on standalone sites is:
http://yoursite.com/wp-login.php
Where http://yoursite.com is your domain name.
For hosted services like EduBlogs.org and WordPress.com, the login links are on their home pages, usually the top right corner of the page.
Login credentials for standalone sites are created as part of the installation process. For hosted services, login credentials are created when you set up an account. For both options, hosted and standalone, additional user accounts can be created in addition to the original administrator login created upon installation or account setup.
Site Administration Home Page
The initial page you see once logged into WordPress is the site administration home page.
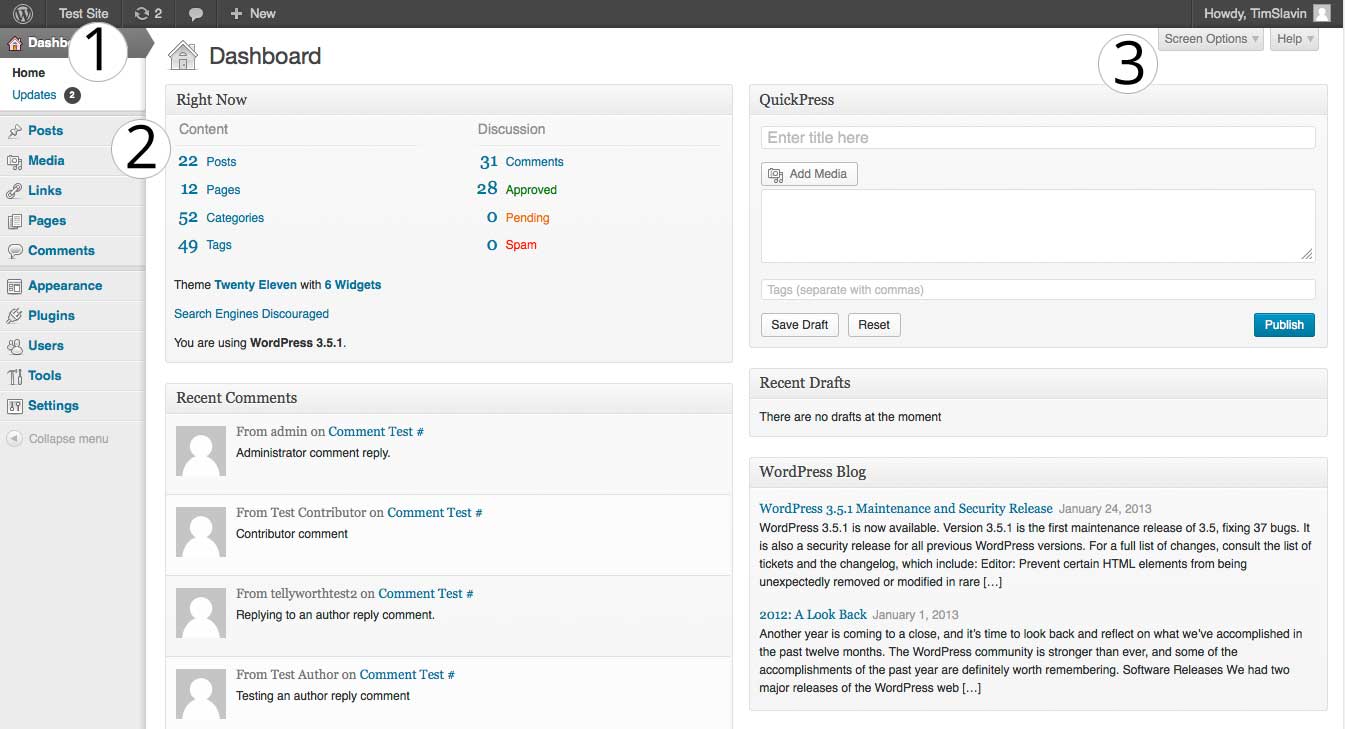
The key elements of the WordPress administration pages are:
- Hover your mouse over this link (the site name) and the Visit Site drop down appears. Click the Visit Site link to display your website.
- The left column links take you to Posts, Pages, Comments, Appearance, and Users, among other options.
- The Screen Options tab lets you choose some of what appears on your administration site home page. Help tab provides contextual information.
The WordPress Add New Post/Edit Post Page
The Add New Post and Edit Post pages are fairly simple to understand:
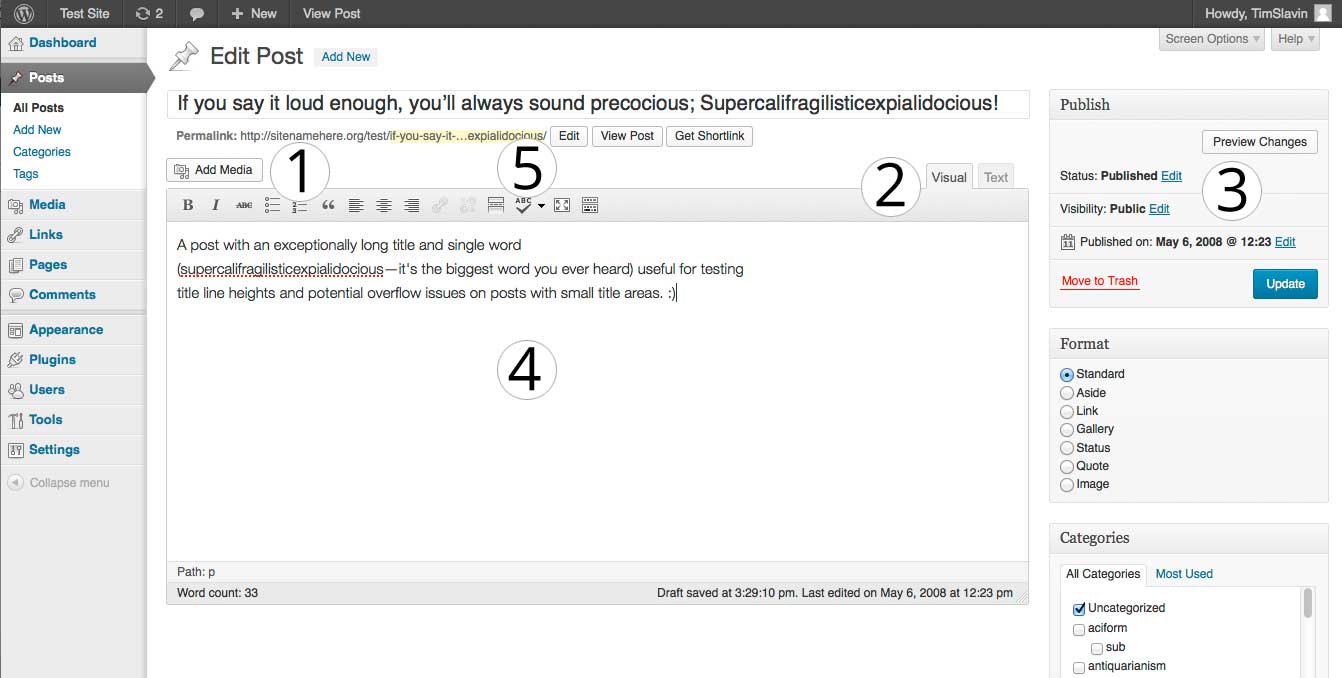
The key elements of the WordPress Add New Post/Edit Post pages are:
- Click the Add Media button to add images and files or link to existing images and files.
- The two tabs for the edit box are Visual and Text. Visual displays a Microsoft Word-like interface while the Text tab allows you to enter HTML tags along with your content.
- The Publish box lets you set Status, Visibility, and the Published on date.
- The content area of the edit box is where you enter content.
- The Edit button to the immediate right of the Permalink lets you edit the page name portion of the permalink.
Authoring in WordPress
Authoring involves adding, editing, and deleting content. Typically, on a WordPress or other multi-author site, the authors add their content while site administrators and/or editors are responsible for editing and publishing their content.
Instructions below start from simple then evolve to complex. For example, how to change a publication date is included in the Edit Content section, not the Add Content section. This allows students to learn simple tasks before they tackle more subtle tasks.
We’ll begin with a description of the edit box used to enter content in WordPress.
The WordPress Edit Box
Whether as a first lesson, or while showing students how to add content for the first time, it is important to describe the basic elements of the WordPress edit box that appears on the Add Post and Edit Post pages.
The key elements of the edit box to describe are:
- The Add Media button to the top left of the Edit box. If you click anywhere in the content box then click the Add Media button, you can upload an image or file and have WordPress automatically insert the link code into your content where you clicked.
- The Visual tab on the top right of the Edit box. This tab lets people create content the way they do in Word, without having to touch HTML code. A set of buttons to easily bold, italicize, indent, bullet, and number items appears when you click this tab.
- The Text tab on the top right of the Edit box. This tab lets people see the same content as in the Visual tab but with any HTML code displayed. The only code missing will be the HTML P or paragraph tags WordPress automatically adds in to separate paragraphs of content. A series of buttons to easily add bits of code appears when you click this tab.
Add Content to WordPress
To add content:
- Login to WordPress. The site administration home page appears.
- Hover your mouse over the Posts link on the left side of the site administration page. A flyout menu appears.
- Click Add New from the Posts flyout menu. The Add Post page appears.
- Enter content title in the top left input field. Usually the field says, “Enter title here.”
- Enter content in the center content box.
- Click the Publish button to save and publish the content immediately.
- Visit your site to see the new content.
To visit your site, either use the URL given to you when you signed up, or your domain name if your site is standalone.
In most cases, you also can find your site name in the top left corner of the WordPress site administration navigation. Hover your mouse over the site name to display a drop down menu and select Visit Site. However, clicking Visit Site will replace your site administration pages with your site; you’ll have to click the Back button in your browser to return to the site administration pages. In most browsers, however, you can hover over the Visit Site link then right mouse-click to open a second browser flyout menu and select Open in New Tab or Open in New Window to open your site in a new browser tab or window.
Edit Content
To edit content:
- Login to WordPress. The site administration home page appears.
- Click the Posts link on the left side of the site administration page. A list page with all posts appears.
- Click the post title from the list of posts. The Edit Post page appears.
- Edit the title and content, as needed.
- Click the Update button to save and publish the content immediately.
- Visit your site to see the new content.
Editing a post (or page) also can involve changing the content status, visibility, or publication date. These are set with links found in the Publish box at the top right of the Add Post and Edit Post pages.
- Status can be set to Published, Pending Review, and Draft. Published is the default. Selecting Pending Review or Draft, then clicking the OK button and Update button, allows authors to create and edit content without publishing.
- Visibility can be set to Public, Password Protected, or Private. Public is the default. Selecting Password Protected displays a box to enter a password required to view the page. Selecting Private displays the page only to yourself.
- Published lets you set the specific date and time a post appears. Click the Edit link to the right of the currently displayed publication date and time to display a month drop down list and input fields for day, year, hours, and minutes. If publication date is set to the future, the post will appear for the first site visitor who arrives after the set date and time; that could be moments later or a week later, depending on your site traffic.
The Status, Visibility, and Published options require a two-step process to save: click the OK button next to the Status, Visibility or Published area then click the Update button to save. Clicking the OK button is not enough.
Finally, the Permalink can be edited and customized. To do so, click the Edit button that appears directly under the post title. The page portion of the permalink will appear in an input field. After any changes are made, click the OK button to the right of the input field and the Update button to the right, in the Publish box. This two-step process is required to save changes to the permalink.
Delete a Post
To delete a post:
- Login to WordPress. The site administration home page appears.
- Click the Posts link on the left side of the site administration page. A list page with all posts appears.
- Hover your mouse over the post title from the list of posts. A set of links appears under the title: Edit, Quick Edit, Trash, and Preview.
- Click the Trash link to place the story in the Trash.
- Click the Trash link at the top of the list of posts. The Trash page appears with a list of posts.
- Hover your mouse over the post title from the list of posts. A set of links appears under the title: Restore, Delete Permanently.
- Click the Delete Permanently link to delete the story.
WordPress deletes content in a two-step process. The first step puts a post in the Trash. The second step requires clicking to the Trash page then clicking the Delete Permanently link that appears when you hover over the post title. This extra step ensures content is not deleted accidentally.
WordPress Site Administration
Skills needed to administer a WordPress site are diverse but not complicated. They include adding users, editing then approving content, approving or rejecting comments, changing themes, and similar tasks.
Most administrative tasks can be taught with the same basic WordPress site you setup to teach authoring. Some WordPress plugins might add tasks, for example, handling feedback entered through a Contact 7 plugin. Or configuring website backups with BackWPUp or similar plugin.
These administrative tasks are taught below:
- Approve and Edit Content
- Add and Permission User Accounts
- Manage Comments
- Change Themes
Approve and Edit Content
The easiest place to start teaching WordPress site administration is to begin where authoring leaves off.
When user accounts are established (see below), if users are assigned the Author role, they cannot publish their content immediately. Instead, a user assigned the Editor or higher role must approve content.
To approve content:
- Login to WordPress. The site administration home page appears.
- Click the Posts link on the left side of the site administration page. A list page with all posts appears.
- Click the post title from the list of posts. The Edit Post page appears.
- Edit the title and content, as needed.
- Change the permalink, status, visibility, or publication date, as needed. See the Edit Content section above for details.
- Click the Update button to save and publish the content immediately.
- Visit your site to see the new content.
Add and Permission User Accounts
To add and permission user accounts:
- Login to WordPress. The site administration home page appears.
- Hover your mouse over the Users link on the left side of the site administration page. A flyout menu appears.
- Click Add New from the Users flyout menu. The Add User page appears.
- Enter Username, E-mail address, First Name, Last Name, and Password.
- Check the Send Password? checkbox if you want to send their password in clear text in an email. This is not a good idea unless the user immediately logs in to change their password. In most cases, it is best to create a password then communicate the details in person.
- Select the role for the user. Options are Subscriber, Contributor, Author, Editor, and Administrator. Contributor is appropriate for students who only create content (but do not publish), Editor if you want to use the role, and Administrator for students who will perform all roles.
- Click the Add New User button to save and add the user account immediately.
See the Roles and Capabilities link from WordPress.org below for details about each role in WordPress. For students, these are the most likely roles to use:
- Contributor is for authors who manage their content but do not publish.
- Author is for authors who manage and publish their content.
- Editor is for people who can create and publish content, as well as edit and publish content from all authors.
- Administrator is for people who have full privileges to add and edit content, permission users, manage templates, and all other tasks.
Manage Comments
One common task is monitoring comments generated by site visitors. This includes the ability to view, edit, approve, and reject comments. The ability to manage comments in WordPress is an important skill for students who use blogs to write content and interact with their readers.
Students who only author content will interact with commenters through the comments form on each post they publish. Students with administrator or editor privileges can use both the comments form on any post page and the back end site administration pages.
To manage comments as a site administrator or editor:
- Login to WordPress. The site administration home page appears.
- Click the Comments link on the left side of the site administration page. A list page with all comments appears.
- Hover your mouse over any entry in the Comment column. A set of links appears: Approve (or Unapprove, if the comment has been approved earlier), Reply, Quick Edit, Edit, Spam, and Trash.
- Click the appropriate link, as needed.
Clicking the Reply and Quick Edit links displays a small form inline with the ability to make edits. Clicking the Edit link opens a new page with a form to edit the comment.
Clicking the Spam link places the comment into the Spam folder. To delete comments marked as spam, click the Spam link directly above the list of comments. This opens the Spam comment page. Hover over a comment on the spam page to display a link to delete the comment permanently.
Clicking the Trash link places the comment into the Trash folder. To delete trashed comments, click the Trash link directly above the list of comments. The Trash page appears. Hover over any comment on the Trash page to display a link to delete the comment permanently.
Change WordPress Themes
WordPress includes different templates used to display content for your website. Hosted services, for example, provide a variety of templates. The standalone WordPress site includes two or three default templates and people are expected to look on the internet to find free and paid templates.
To change a site template as site administrator:
- Login to WordPress. The site administration home page appears.
- Click the Appearance link on the left side of the site administration page. A page with available templates appears. Below each template are links: Activate, Live Preview, Details, and Delete.
- Click the Live Preview link to view the site content in the selected template.
- Click the Activate link to change the template.
- Visit your site to confirm the new template displays properly.
In some rare cases, clicking the Live Preview link does not display a site accurately in the selected template. Elements may appear broken when they work fine on a live website. It is easy enough to activate a template, check your site to confirm the new template displays your content properly, then return to the template page to change back to your original template. As noted at the beginning of this article, WordPress is very forgiving and easy to learn by clicking links. How to teach WordPress to students is not complicated, and makes it easy for students to write and publish online.
Learn More
New to WordPress – Where to Start
http://codex.wordpress.org/New_To_WordPress_-_Where_to_Start
WordPress Lessons
http://learn.wordpress.com/
http://codex.wordpress.org/WordPress_Lessons
Blogging is Elementary
http://kimcofino.com/blog/2008/12/05/blogging-is-elementary/
EduBlogs Teacher Challenges: Setting Up Your Class Blog
http://teacherchallenge.edublogs.org/2011/02/14/student-blogging-activity-1-setting-up-your-class-blog/
http://teacherchallenge.edublogs.org/about/
Prof Hacker: A Better Blogging Assignment
The comments are as useful than the article.
http://chronicle.com/blogs/profhacker/a-better-blogging-assignment/41127
Roles and Capabilities
An explanation of all possible user roles and what actions they can perform. Scroll halfway down the page to the Capability vs Role table for the most details.
http://codex.wordpress.org/Roles_and_Capabilities
Lorem Ipsum
Dummy text from Cicero’s text, The Extremes of Good and Evil, used since the 1500s by publishers who need text that lays out on a page like English text without the chore of finding neutral example text.
http://lipsum.com/