


You might think coding an HTML email is exactly like coding an HTML web page. You'd be wrong. Coding an HTML email is an exercise in learning and coding HTML circa 1998, with some tweaks to adapt to modern phones. CSS is allowed but it has to be placed inline with your HTML code. And your email layout must use HTML tables.
In 2013, most people would say these restrictions are crazy, myself included. These restrictions exist because a lot of email software cannot display modern HTML and CSS. Older versions of Outlook, for example, use the HTML rendering engine used by Microsoft Word which supports an out of date HTML standard.
The number of people who use older email software, especially in offices, is extremely large. While you could ignore these readers, and hope they can read the text version you send along with your HTML email (if you do that), where's the fun or the coding challenge?
Even more interesting, services like Gmail and Yahoo! mail bundle your email code inside of their web page code used to display your email. These services also change your email code, for example, stripping out any classic CSS stylesheet information. Here’s a screen shot to show how Gmail nests an HTML email in all their web page code:
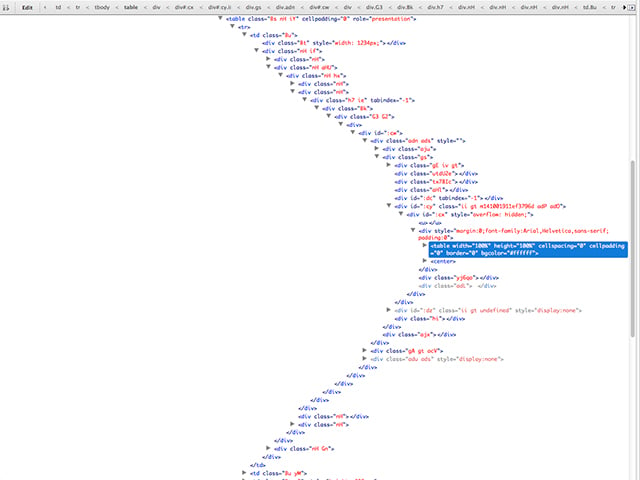
The dark blue highlighted block of code in this image is an HTML email built from nested HTML tables. It’s rolled up into a single line of code so you can see how much Gmail code is wrapped around HTML emails. Note the slider bar on the right edge indicates more code exists above and below what you see in this screen shot. The same dynamic applies for any webmail service. This is the main reason HTML emails need to be wrapped in ancient HTML table code, to ensure they display properly in all email software.
These Help Kids Code projects and puzzles are designed to help practice how to identify then solve problems. With this project, the problem is emailing an HTML web page doesn't work in a lot of situations. The solution is to use HTML code that works in all email software. My goal is to show you the process a professional coder follows to convert an email design into code.
If you are game, let's get started.
Tools You Will Need
For this project, you’ll need to have:
- A text editor (Windows: Notepad, Notepad++; Mac: TextEdit, TextWrangler; Linux: vim, nano, …)
- A web browser (Chrome and Firefox to start, Safari for iPhone testing later)
- An email delivery service with ability to test email (e.g. MailChimp, CampaignMonitor)
Note you do not need an email delivery service. You can emulate how a phone web browser displays by resizing the width of your Chrome, Safari, or Firefox web browser. If you’re creating an HTML email to send, then definitely set up an account with an email delivery service.
The Basics of Coding HTML Email
First, before we start to code an HTML email, you have options beyond hand coding. Many email delivery services today provide canned email templates you can tweak to get a brilliant result. Plus they make it easy to send a text version of your email, always a good idea that also reduces the spamminess of your email.
However, it never hurts to understand how canned HTML email code works, worst case, or how to code an HTML email customized to meet your needs, best case.
Second, there are several things to keep in mind before we code:
- Use a simple text editor like Notepad++ (Windows) or TextWrangler (Mac). Both of these tools are free. Do not use Dreamweaver, Word, or any tool unless they have the ability to output pure untouched HTML code. Even then, you might get annoyed when these editors helpfully (or unhelpfully) convert your CSS code into shorthand and create other problems.
- Use a Chrome and Firefox web browser to test your HTML email code. Near the end of the process, you'll want to test in a wider range of browsers and email clients but we'll talk about testing at the end of this article.
- Your email layout must use HTML tables (or HTML table with columns and rows) to create header, content area, side column (if you use one), and footer. These individual HTML tables (or columns and rows) must then be nested into a single HTML table that will perform the same role as the HTML BODY tag. This outer wrapper HTML table is critical: it's a space ship to protect the code inside, no matter what email software is used to view your email, or what the email software might do to your code. See Figure 1 above for an example.
- CSS must be inline, built into your HTML table elements as well as your basic content-related HTML tags, for example, H1, H2, H3, H4, P, A, UL, OL, and LI. And each bit of CSS must not use shorthand. No padding: 0; allowed. Instead, you have to use padding-top: 0; padding-right: 0; padding-bottom: 0; padding-left: 0; to make your email display properly in all email software.
- Using ancient HTML tags like B instead of STRONG and I instead of EM tags also is important. I did say coding HTML email is like coding circa 1998.
- I'll say it now: padding and margin settings are not your friends. Microsoft Outlook, especially older versions, prefer padding while other email software prefer margins. Space around your content will be the biggest headache you'll face as you code and test. HTML table code also adds the option of cellpadding and cellspacing.
- Finally, the significant increase in the number of people who view their email on a phone means you have to account for how phone email displays. A phone, for example, can display content horizontally or vertically with different results. Email design and layouts need to expand and contract. This also impacts font sizes. The good news? I'll show you a code technique that displays well for both desktop and phones.
What We Will Code
Here is a screen shot of a basic sample HTML email we'll code for this project:
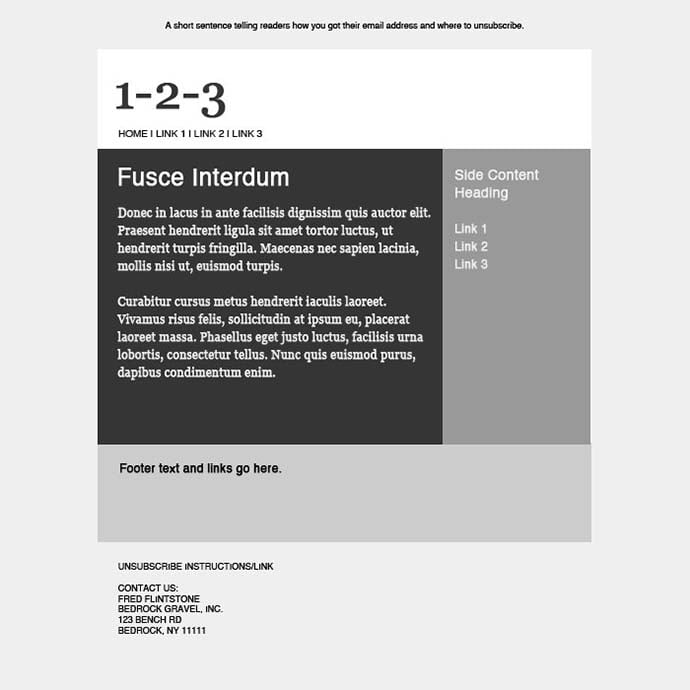
This is a screenshot of a typical two-column email you might receive. We'll code the email so it displays well on phones. Usually you have to pinch the phone screen to zoom in to read these emails because the email is wider than the phone screen. Phone screens are about 480 pixels wide (landscape wide mode) or 320 pixels wide (portrait tall mode) while most HTML email is 500 pixels wide or more.
Here is the screen shot with boxes to show how to convert the email design into a grid structure which we'll turn into nested HTML tables, with each rectangle either an HTML table or an HTML table row and table data cell:
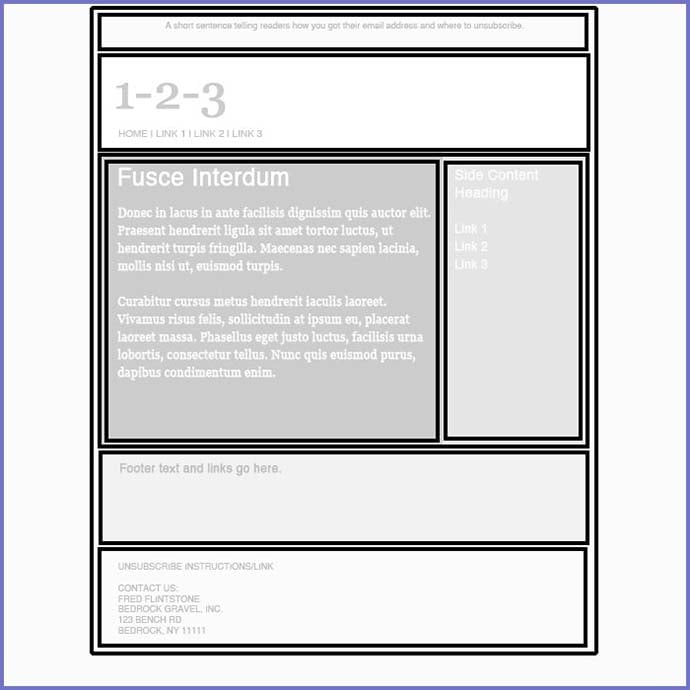
In this design, the purple outer grid will be the HTML table to hold our inside HTML table. The inside table will hold all the parts of the email.
These are the steps we will follow to learn how to code our HTML email:
- Step 1: Define the HTML email (e.g. colors, widths, spacing, images)
- Step 2: Code the HTML Email Layout as Nested HTML Tables
- Step 3: Style the HTML Table Layout
- Step 4: Style the Email Content
- Step 5: Add Email Content to HTML Table Layout Code
- Step 6: Test and Tweak Your Email
To be clear, every programmer works a little bit differently. I find this process worked for me for coding dozens of emails for clients. You might do things differently and, absolutely, if you polled ten different coders who have coded HTML emails, they might work in a different way. There are always several ways to solve coding problems, in other words.
The Learn More links at the bottom of this article also include resources to clarify these tasks. For example, CampaignMonitor.com, an email delivery vendor, provides a helpful chart of what CSS works in what email software. I also link to a real life email that has been neatly dissected and laid out so you can view and study their technique.
If you're ready, let's get started.
Step 1: Define the HTML Email
With any HTML email, you begin with the design. Usually this is a JPEG file, an image hopefully the actual size for the email. In some cases, you have to reduce the image size to a comfortable width, then define all parts of the email. For example, a width of 500 pixels or 600 pixels displays well in most desktop email software, as well as webmail. This step also involves sampling colors and writing down their code values, measuring white space between elements in the email, sizing fonts, and any detail that will help code the correct padding, headings, images, and so on.
Usually I start by printing the JPEG image file then mark up measurements by hand. This marked up printout becomes my map for coding HTML tables to layout the email, coding the CSS styles used for headings and copy, and placing images within the HTML tables.
Here’s what a marked up print out looks like for me:
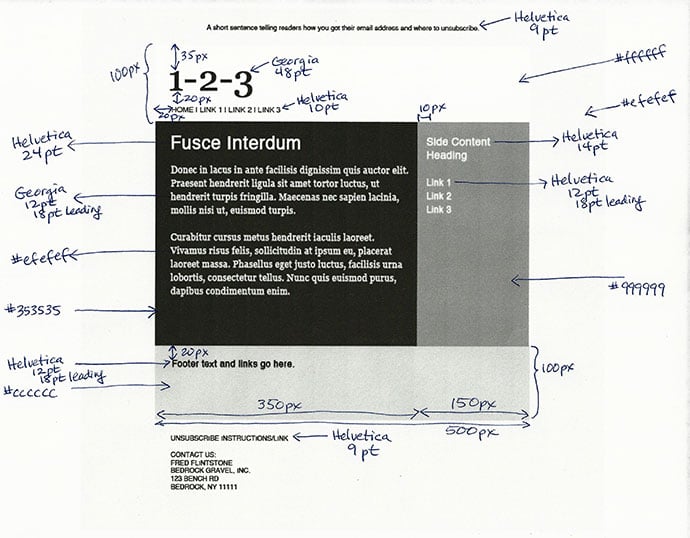
If you don’t know, details like #efefef is the RGB (red, green, blue) color value for a color, in this case the pale grey background behind our email. I extract these color values with Photoshop but almost any graphics program lets you define and extract color values for HTML coding. In HTML, colors range from #000000 (black) to #ffffff (white).
Step 2: Code the HTML Email Layout as Nested HTML Tables
Let's begin with a look at the email layout with a grid overlay shown above in Figure 3:
Each of these blocks will be turned into a nested HTML table or columns and rows in a single HTML table. How the blocks are defined depends on the email design and your preference.
The first table we'll code is the container table that will perform the same role as an HTML BODY tag. This table will contain all our nested tables for header, content area, and footer. The main purpose of this table is to protect the email code inside it.
<!-- First HTML table acts as a pseudo BODY tag to protect email inside -->
<table width="99%" border="1" cellpadding="0" cellspacing="0">
    <tr>
        <td align="center" valign="top">

        </td>
    </tr>
</table>
Notice a few details about the highlighted lines of this code:
- The table width is set to 99% to ensure a thin gap on the sides of your HTML email. Some webmail like Yahoo! and Gmail need this space to display your email cleanly against any ads or other elements in their email software interface.
- border=”1″ is set to help us see the grid layout as we build nested HTML tables. When we have clean code that tests out, we'll set border=”1″ to border=”0″.
- cellpadding=”0″ and cellspacing=”0″ are set to nothing on purpose. As you'll see with other choices, what you actually do depends on preference and your email design. You could set either to 5 or 10 but cellpadding and cellspacing are blunt instruments compared to using the padding and margin styles. What you use depends on your design and CSS options.
- The TD cell with align=”center” will ensure the email inside this table will display centered. The TD (stands for Table Data) cell will hold all the HTML table(s) we'll create to code our HTML email.
- The TD cell with valign=”top” will ensure the email inside this table will float to the top of the email.
Next, let's code the HTML tables for the email layout. This table will hold the header, content area, and footer at a set width. Don't panic when looking at this code. Instead, take a deep breath and look at the comments in the code, as well as sample text.
<!-- First HTML table acts as a pseudo BODY tag to protect email inside -->
<table width="99%" border="1" cellpadding="0" cellspacing="0">
    <tr>
        <td align="center" valign="top">

            <!-- Second HTML table is the email itself -->
            <table class="email" width="500" border="1" cellpadding="0" cellspacing="0">
                <tr>
                    <td align="center" valign="top">

Top message

                    </td>
                </tr>
                <tr>
                    <td align="left" valign="top">

Logo

                    </td>
                </tr>
                <tr>
                    <td valign="top">

                        <!-- Third HTML table is the left column of content -->
                        <table class="email-content" align="left" width="350" border="1" cellpadding="20" cellspacing="0">
                            <tr>
                                <td valign="top">

Left copy

                                </td>
                            </tr>
                        </table>
                        <!-- Close third HTML table -->

                        <!-- Fourth HTML table is the right column of content -->
                        <table class="email-content" align="right" width="150" border="1" cellpadding="20" cellspacing="0">
                            <tr>
                                <td>

Right copy

                                </td>
                            </tr>
                        </table>
                        <!-- Close fourth HTML table -->

                    </td>
                </tr>
                <tr>
                    <td align="left" valign="top">

Footer

                    </td>
                </tr>
                <tr>
                    <td align="left" valign="top">

Bottom copy

                    </td>
                </tr>
            </table>
            <!-- Close second HTML table -->

        </td>
    </tr>
</table>
<!-- Close first HTML table -->
Honestly, this nested HTML table code is fairly easy to explain:
- The first table acts as a pseudo BODY tag. It's width is 99%. It holds all the HTML tables. We've seen this table before.
- The second nested table holds the email and is set to a specific width, in this case, 640 pixels wide. For clarity and to speed this project, this table holds the entire email.
- The top table row (TR) holds the top bit of email content, usually a link to the web page version of the email but also a short sentence telling readers how you got their email address and where to unsubscribe.
- The second table row (TR) holds the header with the logo and links if any.
- The third table row (TR) holds the email copy in one column and the right column. The left column is the third HTML table while the right column is the fourth HTML table. Why use HTML tables instead of table data (TD) cells? To allow these two columns of content to slip down when viewed on a phone. Notice on line 26 the third HTML table code has align=”left” while on line 38 the fourth table has align=”right”. This ensures our HTML email viewed on a phone will degrade nicely; content will slide down to make it easy to scroll. Also notice we set cellpadding=”20″ on both these tables.
- The fourth table row (TR) holds the footer content.
- The fifth and last table row (TR) holds the bottom of the email content, usually the sender contact information and links to unsubscribe and share with a friend.
As you work with HTML tables, be sure to set the border= setting to 1. This will display the outlines of all parts of your HTML table and make it easier to debug any problems.
If you compare this code with the original design we started with, in Figures 2 and 3 above, we have accounted for every part of this email. Now it’s time to add code in a series of steps.
Step 3: Style the HTML Table Layout
With our email layout coded as nested HTML tables, let's add background colors to the HTML tables based on our marked up printout of our design, shown in Figure 4.
<!-- First HTML table acts as a pseudo BODY tag to protect email inside -->
<table width="99%" border="1" cellpadding="0" cellspacing="0">
    <tr>
        <td align="center" valign="top" bgcolor="#efefef">

            <!-- Second HTML table is the email itself -->
            <table class="email" width="500" border="1" cellpadding="0" cellspacing="0">
                <tr>
                    <td align="center" valign="top">

Top message

                    </td>
                </tr>
                <tr>
                    <td align="left" valign="top" bgcolor="#ffffff">

Logo

                    </td>
                </tr>
                <tr>
                    <td valign="top">

                        <!-- Third HTML table is the left column of content -->
                        <table class="email-content" align="left" width="350" border="1" cellpadding="20" cellspacing="0">
                            <tr>
                                <td valign="top" bgcolor="#353535">

Left copy

                                </td>
                            </tr>
                        </table>
                        <!-- Close third HTML table -->

                        <!-- Fourth HTML table is the right column of content -->
                        <table class="email-content" align="right" width="150" border="1" cellpadding="20" cellspacing="0">
                            <tr>
                                <td valign="top" bgcolor="#999999">

Right copy

                                </td>
                            </tr>
                        </table>
                        <!-- Close fourth HTML table -->

                    </td>
                </tr>
                <tr>
                    <td align="left" valign="top" bgcolor="#cccccc">

Footer

                    </td>
                </tr>
                <tr>
                    <td align="left" valign="top">

Bottom copy

                    </td>
                </tr>
            </table>
            <!-- Close second HTML table -->

        </td>
    </tr>
</table>
<!-- Close first HTML table -->
If you compare this code with Figure 4, the marked up printout of our design, you’ll see the colors added in lines 4, 16, 28, 40, and 52. Use the bgcolor= element because it is the native HTML table standard.
Step 4: Style the Email Content
With the email layout sorted, let's tackle content. I add the content shown in Figure 2 above, then the HTML tags, then the CSS styles apart from the HTML table code. It makes the job much less intimidating and easier to manage. If the copy changes, for example, I simply update the copy then paste the new copy into the HTML table layout. It is harder to do the replacement job working with the full set of email code.
Content with CSS could be in a second file or at the bottom of our HTML email file. If you put the marked up content at the bottom of the HTML email file, be sure to remove it as a last step, after you copy or move the marked up content into the body of the HTML email.
To start, let’s add basic HTML tags to our content, for example, headings and paragraph tags H1, H2, and P:
<p>
A short sentence telling readers how you got their email address and where to unsubscribe.
</p>

<h1>
1-2-3
</h1>

<p>
<a href="" target="_blank">
Home
</a> |
<a href="" target="_blank">
Link 1
</a> |
<a href="" target="_blank">
Link 2
</a> |
<a href="" target="_blank">
Link 3
</a>
</p>

<h2>
Fusce Interdum
</h2>

<p>
Donec in lacus in ante facilisis dignissim quis auctor elit. Praesent hendrerit ligula sit amet tortor luctus, ut hendrerit turpis fringilla. Maecenas nec sapien lacinia, mollis nisi ut, euismod turpis.
</p>

<p>
Curabitur cursus metus hendrerit iaculis laoreet. Vivamus risus felis, sollicitudin at ipsum eu, placerat laoreet massa. Phasellus eget justo luctus, facilisis urna lobortis, consectetur tellus. Nunc quis euismod purus, dapibus condimentum enim.
</p>

<h3>
Side Content Heading
</h3>

<p>
<a href="" target="_blank">
Link 1
</a><br>
<a href="" target="_blank">
Link 2
</a><br>
<a href="" target="_blank">
Link 3
</a>
</p>

<p>
Footer text and links go here.
</p>

<p>
UNSUBSCRIBE INSTRUCTIONS/LINK
</p>

<p>
CONTACT US:<br>
FRED FLINSTONE<br>
BEDROCK GRAVEL, INC<br>
123 BENCH RD<br>
BEDROCK, NY 11111
</p>
Notice how I have placed most HTML tags on their own lines:
<p>
A short sentence telling readers how you got their email address and where to unsubscribe.
</p>
This is a trick learned from practice. Which code do you think is easier to read and work with as you build an HTML email: the code with the HTML P tags are on their own lines:
<p style="font-family: Helvetica,Arial,sans-serif; font-size: 12px; line-height: 18px; margin-top: 0; margin-right: 0; margin-bottom: 0; margin-left: 0; padding-top: 0; padding-right: 0; padding-bottom: 0; padding-left: 0;">
A short sentence telling readers how you got their email address and where to unsubscribe.
</p>
or this code with HTML and copy blended together:
<p style="font-family: Helvetica,Arial,sans-serif; font-size: 12px; line-height: 18px; margin-top: 0; margin-right: 0; margin-bottom: 0; margin-left: 0; padding-top: 0; padding-right: 0; padding-bottom: 0; padding-left: 0;">A short sentence telling readers how you got their email address and where to unsubscribe.</p>
It is much easier to manage the long lines of CSS style declarations if each HTML tag is on its own line as you code the email. When I have to go back and edit an HTML email, my first task is to put each HTML tag on its own line. It makes keeping track of code much easier.
It’s also true putting HTML tags on their own lines helps you match open and close HTML tags, to ensure every tag is closed properly.
Let’s style a few of these content bits and talk about how it is done. We will begin with the first bit of content, from the top of the email.
<p style="font-family: Helvetica, Arial, sans-serif; font-size: 10px; line-height: 12px; margin-top: 0; margin-right: 0; margin-bottom: 20px; margin-left: 0; padding-top: 0; padding-right: 0; padding-bottom: 0; padding-right: 0;">
A short sentence telling readers how you got their email address and where to unsubscribe.
</p>
If you compare this code to Figure 4, the marked up printout of our email design, you’ll see I’ve added the font declarations for family, size, and line-height. I’ve set line-height slightly larger than font-size to ensure there’s minimum amount of space above and below this sentence. As you code your HTML email, do make time to play with this type of setting: change line-height to 24px then refresh your web browser to see the change.
Also notice the CSS declarations are in alphabetical order. While I have a compulsive personality, the reason is more workaday: when you have an email with dozens of these long lines of CSS, it is much easier to tweak if your declarations are all in alphabetical order. If you need to change color, for example, you know to look at the start of any string of CSS code. If the issue has to do with a margin setting, you look in the middle of the string in every case.
Next, let’s look at content in the HTML email itself, to see how we set the gutter, the empty space between the edge of the email design and the content. Here’s the content, HTML tags, and CSS styles for the top navigation links:
<p style="font-family: Helvetica, Arial, sans-serif; font-size: 12px; line-height: 12px; margin-top: 0; margin-right: 0; margin-bottom: 10px; margin-left: 20px; padding-top: 0; padding-right: 0; padding-bottom: 0; padding-right: 0;">
<a href="" target="_blank" style="font-family: Helvetica, Arial, sans-serif; font-size: 12px; line-height: 12px; margin-top: 0; margin-right: 0; margin-bottom: 0; margin-left: 0; padding-top: 0; padding-right: 0; padding-bottom: 0; padding-right: 0; text-decoration: none;">
HOME
</a> |
<a href="" target="_blank" style="font-family: Helvetica, Arial, sans-serif; font-size: 12px; line-height: 12px; margin-top: 0; margin-right: 0; margin-bottom: 0; margin-left: 0; padding-top: 0; padding-right: 0; padding-bottom: 0; padding-right: 0; text-decoration: none;">
LINK 1</a> |
<a href="" target="_blank" style="font-family: Helvetica, Arial, sans-serif; font-size: 12px; line-height: 12px; margin-top: 0; margin-right: 0; margin-bottom: 0; margin-left: 0; padding-top: 0; padding-right: 0; padding-bottom: 0; padding-right: 0; text-decoration: none;">
LINK 2</a> |
<a href="" target="_blank" style="font-family: Helvetica, Arial, sans-serif; font-size: 12px; line-height: 12px; margin-top: 0; margin-right: 0; margin-bottom: 0; margin-left: 0; padding-top: 0; padding-right: 0; padding-bottom: 0; padding-right: 0; text-decoration: none;">
LINK 3</a>
</p>
Notice how the P tag has its margin-left set to 20px to ensure this block of code and content position correctly to match our design. Because the A tag and their links are nested in a P tag, every A tag has its margins and padding set to 0. Also notice the A tag has a text-decoration: none to remove the underline from these links (and how text-decoration is placed alphabetically in the last position for all the styles).
Also notice the target=”_blank” code. This ensures people who view your email in Gmail and other web-based applications will open a new window in their web browser to view the link.
Notice, as well, the P tag has identical font-size value and line-height values. This ensures the top navigation links are a 12 pixel high block which helps when measuring all the vertical elements in the header portion of our design.
Next, here is the other element in our header, the 1-2-3 logo wrapped in HTML H1 tags:
<h1 style="font-family: Georgia, Times, serif; font-size: 48px; font-weight: normal; line-height: 48px; margin-top: 20px; margin-right: 0; margin-bottom: 20px; margin-left: 20px; padding-top: 0; padding-right: 0; padding-bottom: 0; padding-right: 0;">
1-2-3
</h1>
Let’s talk about using CSS styles to measure the height of an element, in this case the header of our email.
In Figure 4, our marked up printout of the email design, the height of the header is 100 pixels high. With the top navigation links set to 12 pixels high (by setting font-size and line-height to that value) with a bottom margin of 10 pixels, for a total of 22 pixels for top navigation, that leaves us 78 pixels for the logo and above it (100 – 22 = 78).
The logo code above, shows the logo is 48 pixels high with a top margin of 20 pixels and bottom margin of 20 pixels, for a total of 88 pixels. Plus the 22 pixels for the top navigation and the header is 110 pixels high. The resulting display for this code looks correct to me because the space above and below the 1-2-3 logo are equal. If I reduce both top and bottom margin for the logo by 5 pixels, the result looks odd to me. The logo looks cramped, jammed in.
I mention this because there are cases where the design in a JPEG or Photoshop file doesn’t look perfect when you code it. You might need to add a few pixels.
Finally, let’s look at code for the copy that appears in our email:
<p style="color: #efefef; font-family: Georgia, Times, serif; font-size: 15px; line-height: 22px; margin-top: 0; margin-right: 10px; margin-bottom: 20px; margin-left: 0; padding-top: 0; padding-right: 0; padding-bottom: 0; padding-right: 0;">
Donec in lacus in ante facilisis dignissim quis auctor elit. Praesent hendrerit ligula sit amet tortor luctus, ut hendrerit turpis fringilla. Maecenas nec sapien lacinia, mollis nisi ut, euismod turpis.
</p>
Notice margin-left is set to 0, unlike the P tag and 1-2-3 logo because we set the HTML table code for the third and fourth HTML tables (see code above) to cellpadding=”20″. As you add CSS code to your content, change margin-left to 20px and see what happens. There are different ways to get the left space to your content. Once you decide how, based on what displays well across most or all email software, then adjust your code. Typically, cellpadding works in all email software, including the oldest. CSS margin-left works on most older email software.
Here is our content marked up with HTML tags and CSS styles:
<p style="font-family: Helvetica, Arial, sans-serif; font-size: 10px; line-height: 12px; margin-top: 20px; margin-right: 0; margin-bottom: 20px; margin-left: 0; padding-top: 0; padding-right: 0; padding-bottom: 0; padding-right: 0;">
A short sentence telling readers how you got their email address and where to unsubscribe.
</p>

<h1 style="font-family: Georgia, Times, serif; font-size: 48px; font-weight: normal; line-height: 48px; margin-top: 20px; margin-right: 0; margin-bottom: 10px; margin-left: 20px; padding-top: 0; padding-right: 0; padding-bottom: 0; padding-right: 0;">
1-2-3
</h1>

<p style="font-family: Helvetica, Arial, sans-serif; font-size: 12px; line-height: 12px; margin-top: 0; margin-right: 0; margin-bottom: 10px; margin-left: 20px; padding-top: 0; padding-right: 0; padding-bottom: 0; padding-right: 0;">
<a href="" target="_blank" style="font-family: Helvetica, Arial, sans-serif; font-size: 12px; line-height: 12px; margin-top: 0; margin-right: 0; margin-bottom: 0; margin-left: 0; padding-top: 0; padding-right: 0; padding-bottom: 0; padding-right: 0; text-decoration: none;">
HOME
</a> |
<a href="" target="_blank" style="font-family: Helvetica, Arial, sans-serif; font-size: 12px; line-height: 12px; margin-top: 0; margin-right: 0; margin-bottom: 0; margin-left: 0; padding-top: 0; padding-right: 0; padding-bottom: 0; padding-right: 0; text-decoration: none;">
LINK 1</a> |
<a href="" target="_blank" style="font-family: Helvetica, Arial, sans-serif; font-size: 12px; line-height: 12px; margin-top: 0; margin-right: 0; margin-bottom: 0; margin-left: 0; padding-top: 0; padding-right: 0; padding-bottom: 0; padding-right: 0; text-decoration: none;">
LINK 2</a> |
<a href="" target="_blank" style="font-family: Helvetica, Arial, sans-serif; font-size: 12px; line-height: 12px; margin-top: 0; margin-right: 0; margin-bottom: 0; margin-left: 0; padding-top: 0; padding-right: 0; padding-bottom: 0; padding-right: 0; text-decoration: none;">
LINK 3</a>
</p>

<h2 style="color: #efefef; font-family: Helvetica, Arial, sans-serif; font-size: 24px; font-weight: normal; line-height: 24px; margin-top: 20px; margin-right: 0; margin-bottom: 20px; margin-left: 20px; padding-top: 0; padding-right: 0; padding-bottom: 0; padding-right: 0;">
Fusce Interdum
</h2>

<p style="color: #efefef; font-family: Georgia, Times, serif; font-size: 15px; line-height: 22px; margin-top: 0; margin-right: 10px; margin-bottom: 20px; margin-left: 20px; padding-top: 0; padding-right: 0; padding-bottom: 0; padding-right: 0;">
Donec in lacus in ante facilisis dignissim quis auctor elit. Praesent hendrerit ligula sit amet tortor luctus, ut hendrerit turpis fringilla. Maecenas nec sapien lacinia, mollis nisi ut, euismod turpis.
</p>

<p style="color: #efefef; font-family: Georgia, Times, serif; font-size: 15px; line-height: 22px; margin-top: 0; margin-right: 10px; margin-bottom: 20px; margin-left: 20px; padding-top: 0; padding-right: 0; padding-bottom: 0; padding-right: 0;">
Curabitur cursus metus hendrerit iaculis laoreet. Vivamus risus felis, sollicitudin at ipsum eu, placerat laoreet massa. Phasellus eget justo luctus, facilisis urna lobortis, consectetur tellus. Nunc quis euismod purus, dapibus condimentum enim.
</p>

<h3 style="color: #ffffff; font-family: Helvetica, Arial, sans-serif; font-size: 14px; font-weight: normal; line-height: 14px; margin-top: 20px; margin-right: 0; margin-bottom: 20px; margin-left: 20px; padding-top: 0; padding-right: 0; padding-bottom: 0; padding-right: 0;">
Side Content Heading
</h3>

<p style="color: #ffffff; font-family: Helvetica, Arial, sans-serif; font-size: 12px; line-height: 18px; margin-top: 0; margin-right: 0; margin-bottom: 20px; margin-left: 20px; padding-top: 0; padding-right: 0; padding-bottom: 0; padding-right: 0;">
<a style="color: #ffffff; text-decoration: none;" href="" target="_blank">Link 1</a><br>
<a style="color: #ffffff; text-decoration: none;" href="" target="_blank">Link 2</a><br>
<a style="color: #ffffff; text-decoration: none;" href="" target="_blank">Link 3</a>
</p>

<p style="font-family: Helvetica, Arial, sans-serif; font-size: 12px; line-height: 12px; margin-top: 20px; margin-right: 0; margin-bottom: 20px; margin-left: 20px; padding-top: 0; padding-right: 0; padding-bottom: 0; padding-right: 0;">
Footer text and links go here.
</p>

<p style="font-family: Helvetica, Arial, sans-serif; font-size: 10px; line-height: 12px; margin-top: 20px; margin-right: 0; margin-bottom: 20px; margin-left: 20px; padding-top: 0; padding-right: 0; padding-bottom: 0; padding-right: 0;">
UNSUBSCRIBE INSTRUCTIONS/LINK
</p>

<p style="font-family: Helvetica, Arial, sans-serif; font-size: 10px; line-height: 18px; margin-top: 0; margin-right: 0; margin-bottom: 20px; margin-left: 20px; padding-top: 0; padding-right: 0; padding-bottom: 0; padding-right: 0;">
CONTACT US:<br>
FRED FLINSTONE<br>
BEDROCK GRAVEL, INC<br>
123 BENCH RD<br>
BEDROCK, NY 11111
</p>
Don't forget to test every bit of code you add to your project, to ensure each change you make displays well.
To make this project simpler, I've also left out any images. If you do use images, be sure to place them on a server somewhere on the internet. Email delivery services also will upload your images to ensure they display for months (or longer) after your email is sent.
Step 5: Add Email Content to HTML Table Layout Code
Once you have marked up your content with CSS styles, using a marked up printout of your email design, the next step is to copy and paste the marked up content into your HTML table.
If you remember, in our final HTML table layout example, we have bits of content to help identify which part of the table maps to which content. You should replace “Top message,” for example, with the top bit of marked up content, replace “Logo” with the marked up H1 code and content for the 1-2-3 logo, and so on.
Here is the result, a fully code HTML email:
<html>
<head>
	<title>Help Kids Code Project | How to Code an HTML Email</title>
</head>

<style type="text/css">
    @media only screen and (max-width: 480px) {
    /* mobile-specific CSS styles go here */
        table[class=email], table[class=email-content] { clear: both; width: 320px !important; }
    }
</style>

<body>

<!-- First HTML table acts as a pseudo BODY tag to protect email inside -->
<table width="99%" border="0" cellpadding="0" cellspacing="0">
    <tr>
        <td align="center" valign="top" bgcolor="#efefef">

            <!-- Second HTML table is the email itself -->
            <table class="email" width="500" border="0" cellpadding="0" cellspacing="0">
                <tr>
                    <td align="center" valign="top">

<p style="font-family: Helvetica, Arial, sans-serif; font-size: 10px; line-height: 12px; margin-top: 20px; margin-right: 0; margin-bottom: 20px; margin-left: 0; padding-top: 0; padding-right: 0; padding-bottom: 0; padding-right: 0;">
A short sentence telling readers how you got their email address and where to unsubscribe.
</p>

                    </td>
                </tr>
                <tr>
                    <td align="left" valign="top" bgcolor="#ffffff">

<h1 style="font-family: Georgia, Times, serif; font-size: 48px; font-weight: normal; line-height: 48px; margin-top: 20px; margin-right: 0; margin-bottom: 10px; margin-left: 20px; padding-top: 0; padding-right: 0; padding-bottom: 0; padding-right: 0;">
1-2-3
</h1>

<p style="font-family: Helvetica, Arial, sans-serif; font-size: 12px; line-height: 12px; margin-top: 0; margin-right: 0; margin-bottom: 10px; margin-left: 20px; padding-top: 0; padding-right: 0; padding-bottom: 0; padding-right: 0;">
<a href="" target="_blank" style="font-family: Helvetica, Arial, sans-serif; font-size: 12px; line-height: 12px; margin-top: 0; margin-right: 0; margin-bottom: 0; margin-left: 0; padding-top: 0; padding-right: 0; padding-bottom: 0; padding-right: 0; text-decoration: none;">
HOME
</a> |
<a href="" target="_blank" style="font-family: Helvetica, Arial, sans-serif; font-size: 12px; line-height: 12px; margin-top: 0; margin-right: 0; margin-bottom: 0; margin-left: 0; padding-top: 0; padding-right: 0; padding-bottom: 0; padding-right: 0; text-decoration: none;">
LINK 1</a> |
<a href="" target="_blank" style="font-family: Helvetica, Arial, sans-serif; font-size: 12px; line-height: 12px; margin-top: 0; margin-right: 0; margin-bottom: 0; margin-left: 0; padding-top: 0; padding-right: 0; padding-bottom: 0; padding-right: 0; text-decoration: none;">
LINK 2</a> |
<a href="" target="_blank" style="font-family: Helvetica, Arial, sans-serif; font-size: 12px; line-height: 12px; margin-top: 0; margin-right: 0; margin-bottom: 0; margin-left: 0; padding-top: 0; padding-right: 0; padding-bottom: 0; padding-right: 0; text-decoration: none;">
LINK 3</a>
</p>

                    </td>
                </tr>
                <tr>
                    <td valign="top" bgcolor="#999999">

                        <!-- Third HTML table is the left column of content -->
                        <table class="email-content" align="left" width="350" border="0" cellpadding="0" cellspacing="0">
                            <tr>
                                <td valign="top" bgcolor="#353535">

<h2 style="color: #efefef; font-family: Helvetica, Arial, sans-serif; font-size: 24px; font-weight: normal; line-height: 24px; margin-top: 20px; margin-right: 0; margin-bottom: 20px; margin-left: 20px; padding-top: 0; padding-right: 0; padding-bottom: 0; padding-right: 0;">
Fusce Interdum
</h2>

<p style="color: #efefef; font-family: Georgia, Times, serif; font-size: 15px; line-height: 22px; margin-top: 0; margin-right: 10px; margin-bottom: 20px; margin-left: 20px; padding-top: 0; padding-right: 0; padding-bottom: 0; padding-right: 0;">
Donec in lacus in ante facilisis dignissim quis auctor elit. Praesent hendrerit ligula sit amet tortor luctus, ut hendrerit turpis fringilla. Maecenas nec sapien lacinia, mollis nisi ut, euismod turpis.
</p>

<p style="color: #efefef; font-family: Georgia, Times, serif; font-size: 15px; line-height: 22px; margin-top: 0; margin-right: 10px; margin-bottom: 20px; margin-left: 20px; padding-top: 0; padding-right: 0; padding-bottom: 0; padding-right: 0;">
Curabitur cursus metus hendrerit iaculis laoreet. Vivamus risus felis, sollicitudin at ipsum eu, placerat laoreet massa. Phasellus eget justo luctus, facilisis urna lobortis, consectetur tellus. Nunc quis euismod purus, dapibus condimentum enim.
</p>

                                </td>
                            </tr>
                        </table>
                        <!-- Close third HTML table -->

                        <!-- Fourth HTML table is the right column of content -->
                        <table class="email-content" align="right" width="150" border="0" cellpadding="0" cellspacing="0">
                            <tr>
                                <td valign="top" bgcolor="#999999">

<h3 style="color: #ffffff; font-family: Helvetica, Arial, sans-serif; font-size: 14px; font-weight: normal; line-height: 14px; margin-top: 20px; margin-right: 0; margin-bottom: 20px; margin-left: 20px; padding-top: 0; padding-right: 0; padding-bottom: 0; padding-right: 0;">
Side Content Heading
</h3>

<p style="color: #ffffff; font-family: Helvetica, Arial, sans-serif; font-size: 12px; line-height: 18px; margin-top: 0; margin-right: 0; margin-bottom: 20px; margin-left: 20px; padding-top: 0; padding-right: 0; padding-bottom: 0; padding-right: 0;">
<a style="color: #ffffff; text-decoration: none;" href="" target="_blank">Link 1</a><br>
<a style="color: #ffffff; text-decoration: none;" href="" target="_blank">Link 2</a><br>
<a style="color: #ffffff; text-decoration: none;" href="" target="_blank">Link 3</a>
</p>

                                </td>
                            </tr>
                        </table>
                        <!-- Close fourth HTML table -->

                    </td>
                </tr>
                <tr>
                    <td align="left" valign="top" bgcolor="#cccccc" height="100">

<p style="font-family: Helvetica, Arial, sans-serif; font-size: 12px; line-height: 12px; margin-top: 20px; margin-right: 0; margin-bottom: 20px; margin-left: 20px; padding-top: 0; padding-right: 0; padding-bottom: 0; padding-right: 0;">
Footer text and links go here.
</p>

                    </td>
                </tr>
                <tr>
                    <td align="left" valign="top">

<p style="font-family: Helvetica, Arial, sans-serif; font-size: 10px; line-height: 12px; margin-top: 20px; margin-right: 0; margin-bottom: 20px; margin-left: 20px; padding-top: 0; padding-right: 0; padding-bottom: 0; padding-right: 0;">
UNSUBSCRIBE INSTRUCTIONS/LINK
</p>

<p style="font-family: Helvetica, Arial, sans-serif; font-size: 10px; line-height: 16px; margin-top: 0; margin-right: 0; margin-bottom: 20px; margin-left: 20px; padding-top: 0; padding-right: 0; padding-bottom: 0; padding-right: 0;">
CONTACT US:<br>
FRED FLINSTONE<br>
BEDROCK GRAVEL, INC<br>
123 BENCH RD<br>
BEDROCK, NY 11111
</p>

                    </td>
                </tr>
            </table>
            <!-- Close second HTML table -->

        </td>
    </tr>
</table>
<!-- Close first HTML table -->


</body>
</html>
Notice lines 21, 56, and 78 have tagged these tables with class=”email” or class=”email-content”. This last change ensures our email will display well on phones.
As you can see, we’ve also added the basic HTML code for the top and bottom of emails, as well as a block of CSS style code:
<html>
<head>
	<title>Help Kids Code Project | How to Code an HTML Email</title>
</head>

<style type="text/css">
    @media only screen and (max-width: 480px) {
    /* mobile-specific CSS styles go here */
        table[class=email], table[class=email-content] { clear: both; width: 320px !important; }
    }
</style>

<body>

... email code/content here ...

</body>
</html>
The block of CSS style code is standard-issue @media declaration, on line 7. Any device with a screen width less than 480 pixels will change the width of your tables tagged with class=”email” and class=”email-content” to 320 pixels wide and use the !important notation to force this change, on line 9. The style also will set the tables to clear space both left and right, to ensure the right column content slides down on phone screens. We also could set font-size here, if needed, or any other style targeted to phone displays.
Also note we use table[class=email] notation to get around a problem Yahoo mail has reading CSS declarations.
Also note Gmail and other web-based email services will strip out this CSS block. And older email software will ignore code it cannot understand. This CSS block of code only works for phones and tablets which typically have modern standards-compliant web browsers.
Finally, unlike web pages, the HTML header and footer code does not need to be precise. HTML email is either bundled into a web page for Gmail or similar web services or it is bundled into a block of code sent as email. If you open any email displayed in desktop email software, you’ll discover email is a block of code with at least three parts:
- A wrapper that describes the email and holds both the HTML email and a text email version
- The HTML email
- The text version of the email
Because your HTML email is folded into this larger chunk of code, your and tags do not need to be explicit, as they do with a web page.
Step 6: Test and Tweak Your Email
There are two types of testing for this project, using a web browser as you code and later a more formal test to show how your email displays with a range of common email software.
As noted earlier, web browser tests included refreshing the browser as well as changing the width of the browser to test your email displays well on narrow width phone screens. Testing display based on width is a last step once you have added the CSS @media query.
One key detail to remember about testing: graceful degradation is the goal, not perfection. While it is theoretically possible to code your email to display pixel perfect in every possible email software, some email software might not be worth the effort to tweak your code for hours. For example, it might be worth setting the font size and color of a link in Gmail but not bother setting font values for Lotus Notes if Notes ignores your code and displays a default font. It takes me three or four hours, on average, to code, test, and tweak an email based on a JPEG or Photoshop file. That should be your maximum goal for time spent.
As you code your email, use Chrome and Firefox web browsers to test how well your email displays. Once your code is complete, and displays well in these browsers, you might want to test in Windows if you have a Windows computer. Specifically, test your email in Internet Explorer 7 (or 8) to see if you have any issues. Testing in these older Windows browsers helps identify problems you might encounter with Outlook 2003, 2007, and 2010.
Once you are confident your code displays great in at least Chrome and Firefox, try an email testing service. The easiest way to find one is through an email delivery service. MailChimp and CampaignMonitor both offer tests for free or at a small fee.
While this tutorial is long, believe it or not the topic of how to code HTML email newsletters is vast. There are background images, for example, as well as creating print-friendly emails and much more. Below are several useful links to get you started if you want or need to know more on the topic.
I also would point you to one or both Lynda.com courses I created, especially if you already subscribe to their service. My courses include how to code email, as well as useful topics not really covered anywhere else online, for example, how to design text emails, what emails actually look like as code, and how to automate creation of emails with WordPress and Expression Engine.
Learn More
CodeHTMLEmail.com
I finally built a website dedicated to this topic if you want to learn more from myself and others.
http://www.codehtmlemail.com
Fogbuz: Responsive HTML Emails: a Different Strategy
Another way to code HTML email: as a single column email. Article includes lots of interesting links for more research. However, their Github code sample leaves you stranded to figure out how to code email content. That’s why this article exists.
http://blog.fogcreek.com/responsive-html-emails-a-different-strategy/
https://gist.github.com/tinabeans/6996367
Guide to CSS Support in Email
http://www.campaignmonitor.com/css/
Campaign Monitor: Responsive Email Design
http://www.campaignmonitor.com/guides/mobile/
MailChimp: Email on Mobile Devices
http://mailchimp.com/resources/guides/email-on-mobile-devices/
https://github.com/mailchimp/Email-Blueprints
Email Marketing Field Guide
http://mailchimp.com/resources/guides/email-marketing-field-guide/
Litmus: Responsive & Scalable Email Design: What’s the Difference?
http://litmus.com/blog/responsive-scalable-email-design-whats-the-difference
Responsive Email Design Resources and Templates
Be sure to test any code thoroughly on a wide range of old and new email software.
http://www.emailaudience.com/responsive-design-for-mobile-email-ooh-shiny
http://blog.lyris.com/us/email-inspiration-six-great-responsive-email-designs/
http://www.zurb.com/playground/responsive-email-templates
http://notes.envato.com/general/responsive-email-templates-2/
http://marketingland.com/four-responsive-email-layouts-15858
http://marketingland.com/learning-by-example-9-more-responsive-emails-25864
http://marketingland.com/responsive-email-layout-patterns-29378
Lynda.com HTML Email Coding Courses
Two courses I was fortunate enough to be asked to create for Lynda.com. However, you have to pay to use their service. It happens to be amazingly worthwhile to subscribe to their service, given how much training they offer. I did try to include lots of material not found elsewhere online on the topic of coding HTML email, for example, creating templates in WordPress and Expression Engine to auto-generate emails and how to design text emails.
http://www.lynda.com/Business-Online-Marketing-SEO-tutorials/Creating-an-HTML-Email-Newsletter/94626-2.html
http://www.lynda.com/Business-Online-Marketing-SEO-tutorials/Effective-HTML-Email-and-Newsletters/76981-2.html
http://www.lynda.com/Tim-Slavin/850027-1.html
Add a Background Image to Your Email in Two Simple Steps
Optimizing Your Email for Mobile Devices with the @media Query
http://www.campaignmonitor.com/blog/post/3163/optimizing-your-emails-for-mobile-devices-with-media/
Join Me Sample Email
A random HTML email I saved then cleaned up. The code may or may not follow every rule in this article. Therefore, it might interest you as a case study. Any HTML email can be saved locally on your computer but they will require time and patience to carefully clean the code.
https://kidscodecs.com/files/join-me-email-clean.html
Lorem Ipsum
Based on Cicero’s de Finibus Bonorum et Malorum (The Extremes of Good and Evil), written in 45 BC, this dummy text has been used by printers and publishers since the 1500s.
http://www.lipsum.com
http://www.gutenberg.org/files/29247/29247-h/29247-h.html
http://en.wikipedia.org/wiki/Lorem_ipsum