


FOR THIS PROJECT YOU WILL NEED
- A micro:bit
- An Adafruit Circuit Playground Express
- 2 x Crocodile clips
- A box
- 1 x Piece of long wire wire (a coat hanger will do)
- 1 x short piece of wire (to make a wand)
- Masking tape
INTRO
Do you have steady hands? Could you complete this devious project, designed to test your skills? Games such as this were common in fun fairs and carnivals around the world. They rely on the skill of the player to navigate a twisty course made of conductive wire. The wire is connected to one side of a circuit, and the player uses a wand to navigate the course. If the wand touches the course, then the circuit is closed and completed, allowing power to flow to a buzzer or LED signalling the player has failed.
To build this project all we need are some common items found around the home, and an Adafruit Circuit Playground Express. And to build this project we shall be using Circuit Python, a version of Python developed especially for Adafruit’s range of boards.
In this project we will learn about:
- Loops
- Conditional Tests
- Inputs
- How to use Variables
- How to use functions
So let’s get started!
Audio
Our project needs audio, and for this we have to be very specific. We need a 16bit 22050Hz Mono audio file. A quick Google search will find lots of audio files for use, just make sure that you abide by the terms and conditions of using the audio. You can edit the audio using Audacity, a free audio editing tool for Windows, Mac and Linux. Create your audio and save it as “buzzer.wav” before moving on.
HARDWARE
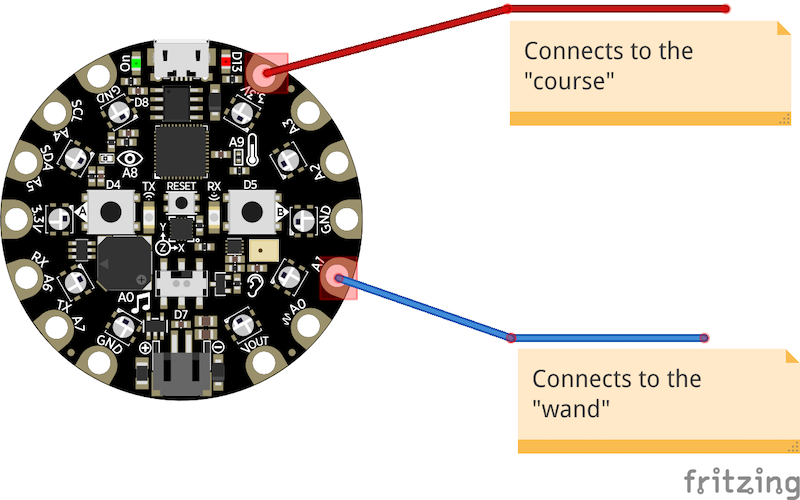
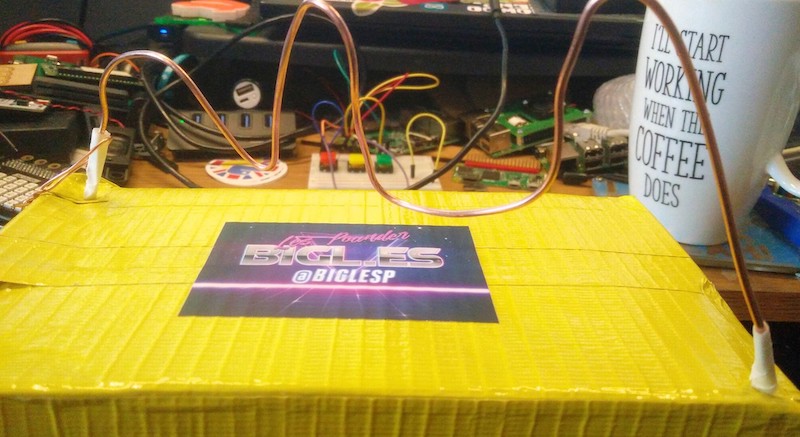
Building the hardware for this project is super simple. First we need to connect crocodiles clips to pins A1 and 3V3. Now take a cardboard box, and make a small hole in one corner. Take a length of wire (coat hanger is great for this) and insert it into the box.

Flip the box over and bend the wire so that it cannot get out. Flip the box right side up and create another hole in a diagonal corner from the first and feed the wire through the hole, and bend it to hold in place.. We now have the start and end of the course, but to make it difficult we need to bend the metal wire. Be careful, and if you need help ask an adult or friend for help.
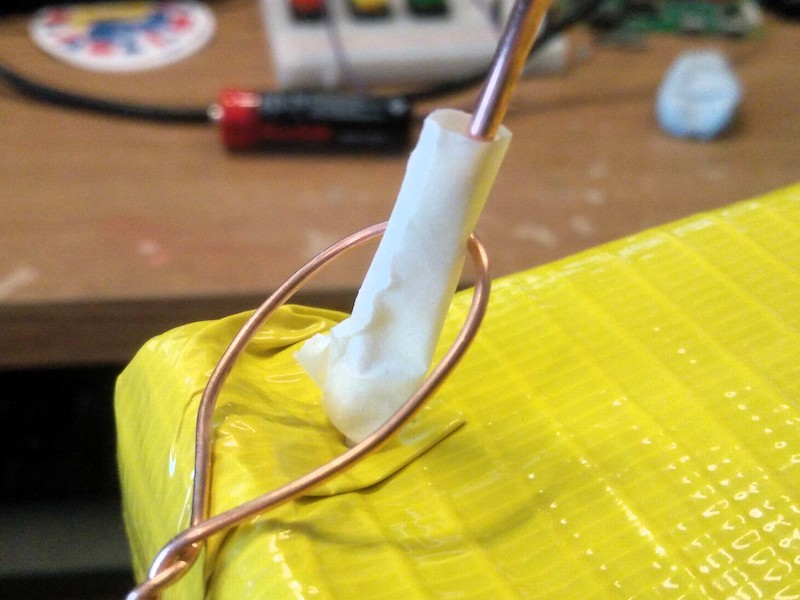
At the start and end of the course, use a little masking or electrical tape to create a safe zone, where the player can rest the wand.
With the course finished, we can now make a wand, using a thinner shorter piece of wire. Form an open hook at one end of the wire, and then place the hook over the wire of the course. Close the hook so that the wand cannot be removed from the course, but remember to keep the wand open enough so that players can have a chance of completing the course.
With the course and wand completed we can now connect them to the Circuit Playground Express. Connect the wand to A1 using a crocodile clip, and on the underside of the box, connect the course to 3V3 using the other crocodile clip. Easy as that! Now we can start writing the code for the project.
To code with the Adafruit Circuit Playground Express, we need to follow the steps to install drivers for our board (Windows only) and then we update our board to the latest software. Once complete we can now move to installing the Mu editor, which we shall use to write the code for the project.
Mu is a beginner focused Python editor, it helps the user with suggestions and hints, and removes a lot of the clutter typically found in Python editors. Mu was created by Nicholas Tollervey, an ex-teacher and passionate Python advocate, as a an easy to use tool for those starting with Python, and in the short time it has been available, it has already gathered many fans, including myself.
Download Mu from https://codewith.mu/ and install it. Before we start Mu, connect your Circuit Playground Express to the computer using a micro USB lead. Start Mu and it will detect the board and ask if you would like to start in Adafruit Circuit Playground Mode, say Yes.
We start the Python code by first importing a few Python libraries. Time will enable us to pace the speed of the game. Board enables us to interface with the CircuitPython Express board, DigitalIO (DigitalInOut, Direction and Pull) enable us to control and read the state of the GPIO, audioio is used to play audio via the board.
import time
import board
from digitalio import DigitalInOut, Direction, Pull
import audioio
The next step is to enable the onboard speaker and set it as an output (so we can hear it).
spkrenable = DigitalInOut(board.SPEAKER_ENABLE)
spkrenable.direction = Direction.OUTPUT
spkrenable.value = True
The Circuit Playground Express also has an built in LED connected to pin 13, and we shall use that as a visual indicator that the player has touched the wire. So we need to tell the code where the LED is and that it is an output.
led = DigitalInOut(board.D13)
led.direction = Direction.OUTPUT
Now let’s setup the code for our wand, which we shall use to carefully complete the game. The wand is simply connected to pin A1 on the board, and it acts as an open switch, it is ready to receive current as an input device and the pin is pulled low, so that when we touch the metal wire of the course, which is at 3.3V, the pin is temporarily pulled high, completing the circuit and triggering the game over.
wand = DigitalInOut(board.A1)
wand.direction = Direction.INPUT
wand.pull = Pull.DOWN
So when the player touched the course with the want, we need the Circuit Playground Express to play an audio file, and for that we need to write a function that we can call when this happens. Functions are blocks of code that can be called when we need them, and when we call them by their name, they will run many lines of code at once. Our function is called “play_file” and it has a parameter in ( ) that is the name of the file that we wish to play.
def play_file(filename):
So what will the function do? Well the next section of code is indented to show that it belongs to the function. We first print the name of the file to Python shell (REPL) for debug purposes and then we create a variable called “wave_file” that will contain the raw data from the file, read (r) by opening the file as a binary file (b) and storing it to the variable.
    print("Playing file: " + filename)
    wave_file = open(filename, "rb")
Now we need to use that file to play the audio and for that we call a function from the audioio library that will play a wave (WAV) file, and play this via pin A0 (which by default is the built in speaker.) We then pass the raw file data to play the file, and using the “playing” function we check that the audio is still playing, and if so we “pass” the code to keep it going until the end of the audio file is reached.
    with audioio.WaveFile(wave_file) as wave:
        with audioio.AudioOut(board.A0) as audio:
            audio.play(wave)
            while audio.playing:
                pass
When the audio is finished, we print “Finished” to the Python shell.
print("Finished")
That is all of the code for the function, and now we move on to the main loop that will constantly run our code. This is a while True loop, and in Python it means “forever”. This loop will constantly run a test to check if the wand is touching the metal wire of the course. If the wand does touch the wire, then the value will change and trigger the code to run, in this case the LED (D13) will light up, we print “True” to the Python shell, we play the audio file “buzzer.wav” using the function that we created, before pausing for half a second.
while True:
    if wand.value:  # button is pushed
        led.value = True
        print(True)
        play_file("buzzer.wav")
        time.sleep(0.5)
But what happens if the wand does not touch the course? Well for that our “else” condition will be activated, and that means nothing will happen, and the LED will be turned off. Then the loop pauses for 0.01 seconds before the entire process repeats.
With the code complete, save the code as main.py on to the CIRCUITPY drive, which is really the Adafruit Circuit Python Express plugged in to our computer. Once the code is saved, the board will automatically reboot, but before we can start to play the game we need to copy the audio file “buzzer.wav” that we created earlier to the CIRCUITPY drive. With that completed we can now play the game and try our hand! Good luck and I hope that you have nerves of steel!
So what have we learnt?
- We’ve learnt that computers make decisions based on logic.
- We’ve learnt that we can control a game using a simple open switch of two wires.
- We’ve learnt how to store data into variables.
- We’ve learnt how to use loops to run the game forever.
- We’ve learnt how to control the pins of a Circuit Playground Express.
- We’ve learnt that hardware stores have components that we can easily use.
- We’ve learnt that cardboard is the best way to prototype ideas.
Complete Code Listing
import time
import board
from digitalio import DigitalInOut, Direction, Pull
import audioio

spkrenable = DigitalInOut(board.SPEAKER_ENABLE)
spkrenable.direction = Direction.OUTPUT
spkrenable.value = True

led = DigitalInOut(board.D13)
led.direction = Direction.OUTPUT

wand = DigitalInOut(board.A1)
wand.direction = Direction.INPUT
wand.pull = Pull.DOWN

def play_file(filename):
    print("Playing file: " + filename)
    wave_file = open(filename, "rb")
    with audioio.WaveFile(wave_file) as wave:
        with audioio.AudioOut(board.A0) as audio:
            audio.play(wave)
            while audio.playing:
                pass
    print("Finished")

while True:
    if wand.value:  # button is pushed
        led.value = True
        print(True)
        play_file("buzzer.wav")
        time.sleep(0.5)
Learn More
More about Python
https://kidscodecs.com/resources/programming/python/
Adafruit official website
Adafruit Circuit Playground Express
https://learn.adafruit.com/adafruit-circuit-playground-express/overview